🌱 How To Propagate Snake Plant
👩🌾 The Master Gardener's Starter Kit
Having a healthy, thriving garden is ten times easier when you aren't fighting with cheap tools. These are the 5 rugged, reliable gardening essentials that experienced landscapers and passionate home gardeners swear by to save time, protect their joints, and get better yields.
✂️ Felco F-2 Classic Manual Pruners
The legendary "buy it for life" pruning shears. Cheap pruners crush stems and spread disease, but these Swiss-made, razor-sharp bypass pruners slice cleanly through thick branches and rose bushes effortlessly. Every single part is replaceable, making it a true lifetime investment.
💧 XLUX Soil Moisture Meter
Overwatering is the number one reason plants die. This simple, battery-free probe completely removes the guesswork from your watering schedule. Just stick it in the soil at root level to instantly know exactly when your veggies, flowers, or houseplants are actually thirsty.
🐍 Flexzilla Heavy Duty Garden Hose
Stop wrestling with stiff, heavy rubber hoses that pinch and cut off water flow. This incredibly lightweight, high-visibility green hose lays completely flat, never kinks under pressure, and is surprisingly easy to coil back up—even in freezing weather.
🧘♀️ Extra Thick High-Density Kneeling Pad
Gardening shouldn't mean suffering joint pain for three days afterward. This ultra-thick, water-resistant foam pad absorbs rocks, roots, and uneven ground, protecting your knees whether you're pulling weeds for five minutes or planting bulbs all afternoon.
🧤 Pine Tree Tools Bamboo Garden Gloves
Finally, a glove that protects hands without making you lose your dexterity. These breathable bamboo-fiber gloves fit like a second skin, allowing you to handle delicate seedlings or grip muddy tools securely while keeping dirt from packing under your fingernails.
Imagine a home brimming with lush, vibrant greenery, where every corner whispers tales of growth and life. What if I told you that you could multiply your favorite snake plants, transforming one into many, without spending a dime? Propagating snake plants isn’t just a cost-effective way to expand your indoor jungle or gift a piece of nature to a friend; it’s a deeply satisfying journey that connects you with the simple magic of gardening. Get ready to unlock the secrets to creating a beautiful, thriving collection of these resilient beauties, adding a touch of nature’s elegance to every nook and cranny of your living space and even your outdoor patio during warmer months.

Quick Overview
Ready to turn one beloved plant into a whole family? This guide will walk you through the surprisingly simple steps to propagate your snake plant, whether you’re aiming for a display of fresh new leaves indoors or planning a stunning container arrangement for your backyard patio.
Time needed: Approximately 15-30 minutes for initial setup, then several weeks to months for roots to establish.
Difficulty: Beginner
What you’ll need: A healthy snake plant, sharp clean scissors or a knife, small pots or glass jars, well-draining potting mix, water, and optionally, rooting hormone.
Step-by-Step Instructions
Propagating snake plants is a rewarding process that allows you to expand your collection, share with friends, or simply enjoy the miracle of new life. We’ll cover two primary methods: leaf cuttings in water and leaf cuttings in soil, both leading to beautiful new plants.
Step 1: Choose Your Mother Plant Wisely
The journey to new snake plants begins with selecting the right parent. Look for a snake plant that is robust, healthy, and free from pests or diseases. A mature plant with several established leaves will provide the best cuttings. Avoid any leaves that are yellowing, soft, or damaged, as these are less likely to root successfully. Think of it as choosing the strongest, most vibrant ancestor for your new green family members!
Step 2: Gather Your Tools & Prepare Your Space
Before you make your first cut, ensure you have everything you need within reach. Cleanliness is paramount to prevent disease.
Sharp, Clean Cutting Tool: A sharp knife, a pair of pruning shears, or even heavy-duty scissors will work. Sterilize your tool with rubbing alcohol or a 10% bleach solution to prevent the spread of bacteria or fungi.
Small Pots/Jars: If propagating in soil, gather small pots with drainage holes. If propagating in water, clear glass jars or vases work perfectly, allowing you to observe root development.
Well-Draining Potting Mix: A mix specifically formulated for succulents or cacti is ideal, or you can create your own by mixing regular potting soil with perlite or coarse sand.
Water: For water propagation, tap water is usually fine.
Rooting Hormone (Optional, but Recommended): This powder or gel can significantly increase your success rate, especially for soil propagation.
Set up a clean, well-lit workspace, perhaps on your kitchen counter or a potting bench in your sunroom. This is where the magic will unfold, so make it a pleasant spot!
Step 3: Make Your Cuttings (The Magic Begins!)
This is where you transform one leaf into the potential for multiple new plants. Carefully select a healthy, mature leaf from your chosen mother plant.
Cut the Leaf: Using your sterilized tool, cut the leaf as close to the soil line as possible. You can propagate an entire leaf, but for more plants, it’s common to cut the leaf into several 2-4 inch sections.
Orientation Matters: If cutting into sections, it’s crucial to remember which end was originally closer to the soil (the bottom). Roots will only form from this end. A clever trick is to cut the bottom end of each section into a “V” shape and leave the top end straight. This way, you’ll always know which end is up!
Pro tip: For variegated snake plants (those with beautiful yellow or white stripes), propagating from leaf cuttings will often result in new plants that are entirely green, losing their signature variegation. This is because the cells responsible for variegation are not always present in the new growth initiated from the cutting. If you want to preserve the variegation, propagation by rhizome division is the best method (see “What’s Next?” for more on this).
Step 4: Let Them Callus (Patience is a Virtue)
Once you’ve made your cuttings, resist the urge to immediately place them in water or soil. This crucial step prevents rot and promotes successful rooting.
Air Dry: Lay your snake plant cuttings in a dry, warm spot away from direct sunlight for several days, or even up to a week. You’ll notice the cut ends drying out and forming a hard, protective layer – this is called callusing.
Why Callus? This callus acts like a scab, protecting the cutting from fungal infections and excessive water loss once it’s introduced to moisture. Without it, your cuttings are highly susceptible to rotting. This waiting period is a small act of patience that pays off immensely!
Step 5: Choose Your Rooting Medium: Water or Soil?
Both methods are effective, and each has its unique charm. Water propagation lets you witness the miracle of roots forming, while soil propagation often yields hardier plants from the start.
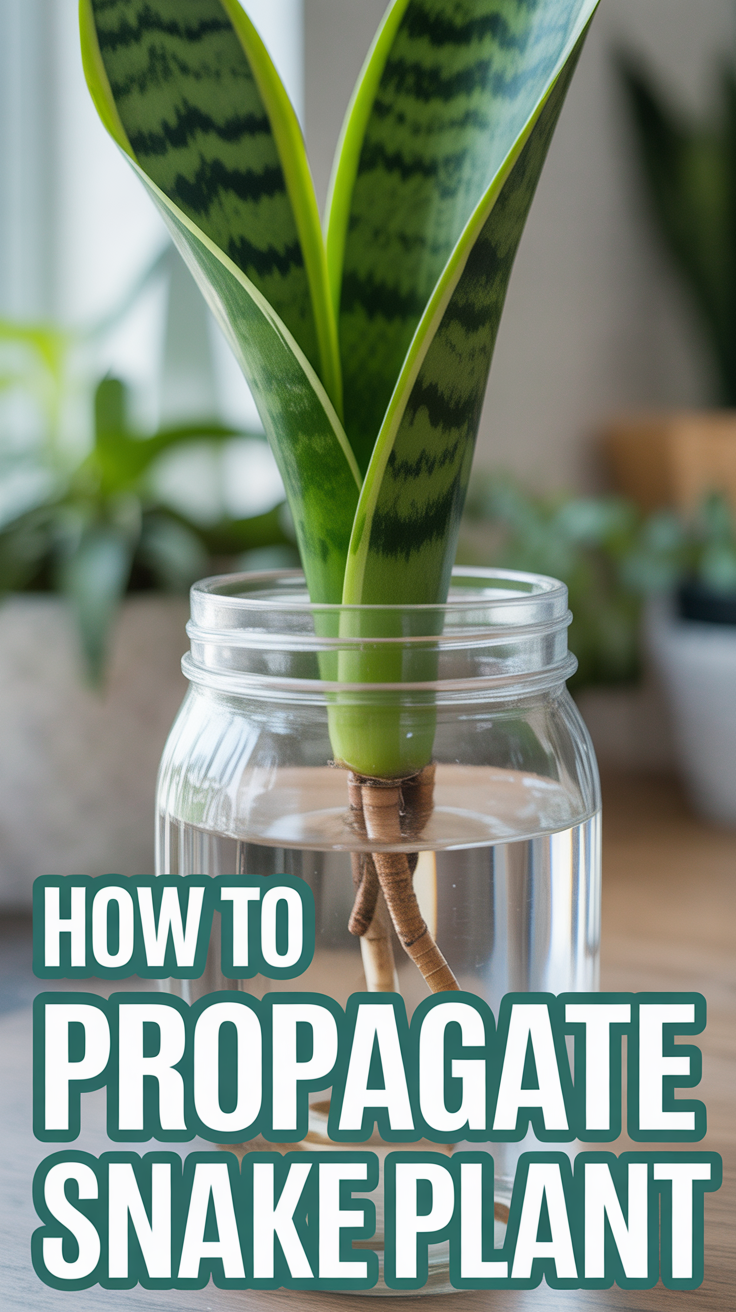
Sub-step 5a: Water Propagation (The Visible Roots)
This method is incredibly satisfying for beginners as you can literally watch the roots grow!
Submerge the Bottom: Fill your glass jars with about an inch or two of fresh water. Place the callused bottom (the V-cut end) of each cutting into the water, ensuring only the bottom tip is submerged.
Bright, Indirect Light: Place the jars in a spot that receives bright, indirect sunlight. Avoid direct sun, which can heat the water too much and stress the cuttings. A shelf near a north-facing window, or a spot a few feet back from a south-facing window, would be perfect.
Change Water Regularly: Change the water every 3-5 days to keep it fresh and oxygenated, preventing bacterial growth.
Wait for Roots: Roots can take anywhere from 3 weeks to 3 months to appear. It’s a test of patience, but the sight of those first white roots is pure joy! Once roots are 1-2 inches long, they’re ready for soil.
Sub-step 5b: Soil Propagation (The Earthy Way)
For those who prefer a more traditional approach or want to skip the transplanting step from water to soil, direct soil propagation is an excellent choice.
Prepare Pots: Fill small pots (with drainage holes!) with your well-draining succulent/cactus potting mix.
Plant Cuttings: Gently insert the callused bottom (V-cut end) of each cutting about 1-2 inches deep into the soil. You can plant multiple cuttings in one larger pot, ensuring they don’t touch.
Initial Watering: Lightly water the soil immediately after planting. The goal is moist, not soggy.
Bright, Indirect Light: Like water propagation, place your pots in a location with bright, indirect light.
Minimal Watering: This is crucial. Snake plants are susceptible to rot. Water sparingly, only when the top inch or two of soil feels completely dry. This might be once every 2-4 weeks, depending on your environment. Overwatering is the most common mistake here!
Testing for Roots: After a few weeks, you can gently tug on a cutting. If you feel resistance, it means roots have started to form. New growth (a tiny pup emerging from the soil) is the ultimate sign of success, often appearing several months after rooting.
Step 6: Provide the Perfect Environment
Whether in water or soil, your developing snake plant babies thrive in specific conditions.
Light: Bright, indirect light is ideal. While mature snake plants tolerate low light, cuttings need more energy to produce roots and new growth. Think of a bright sunroom, a well-lit office, or near a window with sheer curtains.
Temperature: Warm temperatures (65-80°F or 18-27°C) encourage faster rooting. Avoid cold drafts or sudden temperature fluctuations.
Humidity: Average household humidity is usually fine. High humidity isn’t strictly necessary for snake plants, but a stable environment helps.
Step 7: The Waiting Game & Transplanting
Patience is truly a gardener’s virtue, especially with snake plants.
Root Development: Roots can take anywhere from a few weeks to several months to form. Don’t be discouraged if it takes longer than you expect.
Transplanting from Water: Once your water-propagated cuttings have roots that are 1-2 inches long, they are ready for their forever home in soil.
Prepare a small pot with well-draining soil.
Gently remove the cutting from water and plant it in the soil, burying the rooted section.
Water lightly, then resume a sparse watering schedule, allowing the soil to dry out completely between waterings.
Pro tip: When transplanting, try to minimize root disturbance. The transition from water to soil can be a bit of a shock, so be gentle and provide consistent care.
Step 8: Care for Your New Babies
Congratulations, you have new snake plants! Now, it’s time to nurture them into thriving adults.
Watering: Continue the “neglect is best” watering philosophy. Only water when the soil is completely dry. Snake plants are succulents and store water in their leaves, making them highly drought-tolerant.
Light: Provide bright, indirect light for optimal growth. They can tolerate lower light, but growth will be slower.
Fertilizing: Hold off on fertilizing for the first few months. Once established, you can fertilize lightly with a balanced liquid houseplant fertilizer during the growing season (spring and summer), about once a month.
Potting: Snake plants prefer to be slightly root-bound, so don’t rush to repot into a much larger container. Repot only when roots start growing out of the drainage holes or the plant becomes top-heavy.
Common Mistakes to Avoid
Even with such resilient plants, a few common pitfalls can hinder your propagation success.
1. Not Callusing Cuttings: This is the number one cause of rot. Without that protective layer, moisture seeps into the fresh wound, inviting fungal and bacterial infections. Always allow several days for your cuttings to air dry.
2. Overwatering: Especially crucial for soil propagation. Snake plants are desert dwellers at heart. Too much moisture, particularly in poorly draining soil, will lead to mushy, rotting cuttings and eventually, a dead plant. When in doubt, wait another day or two before watering.
3. Using Dull or Unclean Tools: A dull tool can crush plant tissue, creating a ragged wound that’s harder to callus and more susceptible to disease. Unsterilized tools can transfer pathogens from other plants, leading to infections in your fresh cuttings. Always use sharp, clean tools.
4. Insufficient Light: While mature snake plants tolerate low light, cuttings need brighter, indirect light to produce the energy required for root and new leaf development. Placing them in a dark corner will severely slow down or halt the propagation process.
5. Impatience: Snake plants are not sprinters; they are marathon runners. Rooting can take weeks or even months. Constantly checking or disturbing the cuttings can do more harm than good. Trust the process and let nature do its work.
Troubleshooting
Even with the best intentions, sometimes things don’t go as planned. Here are solutions to common propagation issues:
Cuttings Rotting (Mushy, Darkening Base):
Solution: This is almost always due to overwatering or insufficient callusing. If in water, ensure only the very tip is submerged and change water more frequently. If in soil, stop watering immediately and let the soil dry out completely. You might need to cut off the rotted section, re-callus, and start over. Ensure good drainage in your pots.
No Roots Forming After Several Weeks/Months:
Solution: Be patient! Some cuttings take longer than others. Ensure they are receiving adequate bright, indirect light and warm temperatures. If you didn’t use rooting hormone, consider trying it on new cuttings. Sometimes, a cutting just isn’t viable; don’t be afraid to try again with fresh material.
Leaves Turning Yellow or Mushy (Not at the Base):
Solution: This can indicate too much water, too little light, or extreme temperature fluctuations. Check your watering schedule – is the soil completely dry before you water? Move the plant to a brighter spot. Ensure stable room temperatures, avoiding cold drafts from windows or air conditioners.
Key Takeaways
Propagating snake plants is a simple, rewarding process that brings more green into your life.
Choose healthy leaves for cuttings.
Always use sharp, sterilized tools.
Callus your cuttings for several days to prevent rot.
You can propagate in water (watch roots grow!) or directly in soil (less disturbance).
Provide bright, indirect light and warm temperatures.
Be patient – rooting takes time!
Avoid overwatering at all costs, especially with soil propagation.
For variegated plants, consider rhizome division to maintain patterns.
Frequently Asked Questions
How long does it take for snake plant cuttings to root?
Patience is key! In water, you might see roots in 3-6 weeks, but it can take up to 2-3 months. In soil, it’s harder to tell, but expect roots to form within 1-3 months, with new plantlets (pups) emerging from the soil often taking 3-6 months or even longer.
Can I propagate a variegated snake plant (like ‘Laurentii’) from a leaf cutting and keep its stripes?
Unfortunately, no. Leaf cuttings from variegated snake plants typically produce all-green new plants. The cells responsible for variegation are usually not carried over in leaf propagation. To maintain the beautiful yellow or white stripes, you need to propagate by division, separating offsets directly from the mother plant’s rhizome.
What’s the best time of year to propagate snake plants?
The best time is during the plant’s active growing season, which is typically spring and summer. Warmer temperatures and longer daylight hours encourage faster rooting and growth. However, with stable indoor conditions, you can successfully propagate snake plants any time of year.
Do I really need rooting hormone?
While not strictly necessary, rooting hormone can significantly increase your success rate and often speed up the rooting process. It’s particularly helpful for soil propagation. If you’re a beginner or have had trouble rooting in the past, it’s a worthwhile investment.
What’s Next?
You’ve successfully propagated your snake plants – congratulations! Now, let’s explore how these resilient beauties can transform your home and garden into a Pinterest-worthy oasis.
Expanding Your Indoor Jungle
With your new snake plant babies, the possibilities are endless. Group different sizes and varieties of snake plants together in a stunning container garden for a minimalist, modern look in your living room. Place a tall, elegant snake plant in a decorative pot next to your favorite armchair, creating a tranquil reading nook. Use smaller propagated plants to create charming vignettes on bookshelves, bathroom counters, or as a vibrant centerpiece on your dining table. Imagine a serene bedroom, enhanced by the air-purifying qualities and architectural beauty of these plants, bringing a touch of nature-inspired calm to your daily routine.
Bringing Life to Your Outdoor Spaces (Seasonal)
While primarily indoor plants, snake plants can be fabulous additions to your outdoor spaces during warmer months, typically when nighttime temperatures consistently stay above 50°F (10°C). This is generally from late spring to early fall, depending on your USDA hardiness zone.
Backyard Patios & Decks: Arrange your propagated snake plants in stylish planters on your patio or deck. Their upright form provides excellent vertical interest and contrasts beautifully with trailing plants. Combine them with vibrant annuals in flower beds or larger container arrangements for a dramatic, low-maintenance display.
Container Gardening: Snake plants are perfect for mixed container gardens. Pair them with colorful petunias, coleus, or even small ornamental grasses for a stunning visual effect. These arrangements can adorn your front porch, flank your garden gate, or add a touch of sophistication to a small space garden on a balcony.
Focal Points: Use a particularly striking snake plant in a decorative pot as a focal point in your garden. Place it amidst a bed of cheerful marigolds or delicate impatiens for an unexpected textural contrast.
Small Space Gardening: For urban dwellers or those with limited outdoor space, snake plants excel in balcony gardens or window boxes. Their vertical growth habit makes them perfect for maximizing greenery without taking up much horizontal room.
Beyond Snake Plants: Your Propagation Journey Continues
The skills you’ve honed propagating snake plants are transferable! Many other popular houseplants are incredibly easy to propagate from cuttings:
Pothos: Simply snip a stem below a node and place it in water.
Spider Plants: “Spiderettes” (the little plantlets) can be rooted in water or soil.
ZZ Plants: Similar to snake plants, leaf or stem cuttings can be propagated, though they take even longer.
Consider exploring these to further expand your green thumb repertoire and create an even more diverse and beautiful collection.
DIY Garden Projects & Pinterest-Worthy Ideas
Your newly propagated snake plants are perfect for various DIY projects.
Custom Planters: Repurpose old teacups, vintage tins, or even painted glass jars into unique planters for your small snake plant babies.
Vertical Gardens: Create a stunning living wall by mounting small planters with your snake plants, adding a dynamic, lush element to an otherwise blank wall, indoors or on a sheltered patio.
Gift Giving: A beautifully potted, home-propagated snake plant makes a thoughtful, personalized gift for friends and family, sharing the joy of gardening.
Embrace the joy of creation. Imagine a serene backyard patio, adorned with a collection of your homegrown snake plants, nestled amongst fragrant lavender and colorful hydrangeas. Picture a vibrant vegetable garden, where your propagated beauties stand guard, bringing structure and year-round green. Whether your style is rustic cottage, modern minimalist, or bohemian chic, your propagated snake plants are versatile enough to fit every aesthetic, transforming your home and garden into a personal sanctuary.
So, what are you waiting for? Grab those shears, select your mother plant, and start propagating today! The journey of a thousand green leaves begins with a single cut.